Pages

Friday, December 27, 2013

Adapterplate, Cooling system and Controller update.


This post is very delayed because it took long to set things in motion and we wanted to wait a little so that we could show a little more progress.  

The last couple of weeks we have been working a lot on how we are going to mount the motor on the transmission. First we made contact with a local workshop and asked for advise. The workshop had worked on a electric car before so they could give us much relevant information. They also said that they could help us build the custom parts we needed. We started to make drawings and after that we went out searching for some metal.

What we need is a axle adapter between the motors axle and the transmissions axle. And we also need a adapter plate that holds the motor in place on the transmission. 

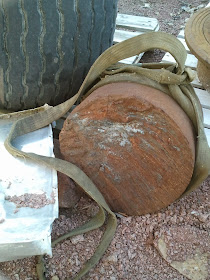
At a junkyard we found this crazy big clump of metal that was perfect to use when we are going to make the adapter plate. 

400 mm diameter axle is perfect for us. 
We also found this old propeller axle that we are going for the axle adapter.

100 mm diameter axle.
 We did not have a big enough lathe to do the initial processing on the adapter plate so we had to send it to a bigger workshop first. They where going to cut it down to 328 mm diameter and make a hole in the middle of it.


Here we have it before it was sent to the workshop for the processing.
400 mm diameter and 50 mm thick 

While we waited for the adapter plate to be done we started to work on the cooling system.
We went to the car scrapyard and found a easy to dismantle and small size radiator. Simon started with checking if the heat sensor and fan motor was working. 
Here you can see him boiling the sensor and testing at what temperature it outputs a signal.

It is switched on at 91°C and off at 86°C.

Then he tested the motor and found that the system is working great.


He is heating the sensor with the heatgun and after awhile the motor started to spin.   

I have worked hard on trying to backwards engineer the controller we got. As you may know we did not get a manual for it and the company we got the controller from is now bankrupt. I got in touch with a exworker from the company and we have gotten a few question marks solved but i still have a few problems left. 

The controller
After a while we got back the adapter plate and we sent it to our friends at the small workshop. So that they could make the final processing.

A shiny adapter plate


The adapter plate next to the transmission.

Saturday, November 23, 2013

Yay, the Bodywork is Done

 This week Simon welded the last bodywork on to the car.
Custom made part.

Left side is done
 Now we only have one part left to fix. The fuel tank inlet.
Abra

Kadabra

Alakazam

Where did it go? 
 And I installed the vacuum pump.
Now i only need the last parts for the brakes so that we can test if it works. 
 We did not get any documentation on the motor/controller system. So I opened up the controller so that I can figure out how we are going to connect it to the system.


Tuesday, November 12, 2013

Almost done with the bodywork

This week Simon continued with the rear right corner. 

Checking if it fits.

Can you spot the welding?
Also last week Simon upgraded the workshops sound system.
BOOM BOOM! 
 Then he started to fix on the corner.
Old vs new 

After the welding we tested that the signal light box still fitted.

We only have one bodypart left to fix. So with a little luck we can start work on more fun stuff.

Tuesday, November 5, 2013

Surprise! More Bodywork

This week Simon has started to replace the bigger side plates.

Rear left

The new toy we got.

It bends the metal so the welding is super easy.

The new plate in place.
 Then he started to work with the rear right plates.

The new parts.

The battery tray.

Cutting away rusted parts.

Preparing for the new plate.
 I have started to install the new brake lines.

The front part of the brake system.

The rear part of the brake system.
I still have 2 pipes left to install, but i need to wait until we have the parts we are missing for the right side brakes.

We also have talked to some guys about the adapter plate between motor and the transmission. They gave us valuable information about how we could solve our problem.

While we were talking we noticed a weird thing on the motor. The company that have made this motor fucked up and drilled wrong. They somehow drilled the hole for the flange and the hole for the hoisting ring at the same place. So they had to drill a new hole for the hoisting ring a little to the side.
Prime example of a fuck up.
You can see how only half of the thread is left.

Sunday, October 27, 2013

Much school work and a little car work

So first some pictures of things that we finished last week but i forgot to take a picture of.

Good as new
Left door after its makeover

I had started to renovate the gear rod and now it is fixed.
Old vs new

I also took out the transmission so that we could get more room when working on the adapter plate.
I think it likes to be tied down.

Simon got out the brake pistons from one of the calipers. But on the other one the piston broke and we started to look after new ones. Alternative we buy a new caliper.
Left front brake is done. Now i just need to fix the brake pipe system.

Simon started to work on the right side door. Not as much damage as the left side so it soon was in working condition.
Then he moved along the right side and fixed various rust damages and old repairs.

Next week we have more time for the car and we hope we will get much progress done.
/Oskar

Saturday, October 19, 2013

Santa is early this year


First thing first. This is how the engine room looked after Simon´s hard work and some paint.
We are going to do the final paint after the motor holder is in place.

Okay so we had already got the motor and controller but they forgot to send us the switches and control cables, and we have been waiting forever for them to send the rest of the parts.
When finally we got it, guess what, they still messed up and did not send all the parts we ordered.
The cooling pump, 3 switches and a battery gauge.

Cable that goes from the controller to all the switches. 

The motor that got delivered 3 months ago.


The controller that we got at the same time as the motor.
We also got a crazy big vacuum pump because PAF wanted to pay a little more when it comes to the brake system. 
The vacuum pump that also got delivered with the motor and controller.
 We also got our repair parts for the car.

Big package for big boys.

One of the many boxes we got.

Started to check if everything got delivered.

Simon started with switching out metal panels.
This is such a simple metal panel that we could have made it ourself but it did not cost much so what the hell.

Just doing some measurements.

Now Simon had taken away all the rusted metal and painted the inside.

I started to check on the breaking system and decided to start on the left front disc brake.
We had decided to keep the caliper and switch out almost everything else.
Let the transformation begin.
I did not get long in the process before i got a problem. The brake pistons were crazy stuck and we did not have the proper tools for taking it apart. So i have to go and borrow the right tools next week.

While i was at the brake i changed the shock absorber and painted the brake plate.
While i waited to fix the front brakes I started on the rear brakes.
And once more i got stopped in my tracks, we had forgot to order the brakeshoe self adjusting screws for the brakes.
So i started to work on the gear shift/transmission but i have no pictures of that yet.
Old to the left and new to the right.
At this point Simon was done with the panel at the back and had moved to the driver side floor step. 

I forgot to take a picture of how it looked before he started. But if i say RUST you maybe get the picture.

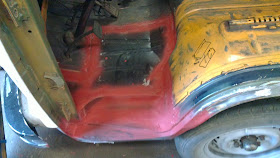
After a lot of measuring, 3 metal plates a fair amount of welding and a little paint this is how nice it got.


Simon got a whole 10 minutes of rest before he started with the next thing.

Next up was the door. It had much rust along the bottom side and it was basically the paint that hold it together.
A quick check if it was the right door we ordered.


All the rust have been cut away and we can see the entrails of the door. 

Only a little welding left and it can be mounted back on the car.


So this week we got much work on the car because we were free from school and we got most of our stuff.

/Oskar